March 1, 2024
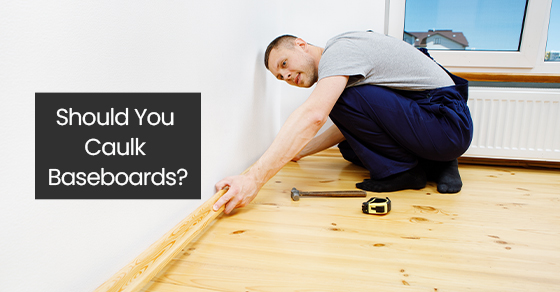
Should You Caulk Baseboards?
Baseboard moulding provides a finishing touch to your walls, helps hold the flooring in place, and can be dressed up or down as a subtle design feature. When installing baseboard moulding, you might wonder whether you should caulk them. Here, we look at caulking in the baseboard installation process to help you decide whether you’re for or against it.
What is Baseboard Moulding?
To be clear, we’re talking about the same thing: your baseboards are moulding installed where your floors and walls meet. They tend to be one of the unsung heroes of trim, not getting much attention in the average home.
However, not only do baseboards play a practical role in protecting your walls and holding your floors in place, but they also help add more character to your home with many design choices available. They also come in different materials. It makes finding the right choice for your budget easier with PVC, MDF, finger-jointed wood or stain-grade wood as the premium option.
What is Caulking?
Caulking comes in many different materials and serves many purposes, from a protective sealant in bathrooms to exterior protection against the elements and foam caulking to seal up vulnerabilities that lead to energy inefficiency to a finishing touch for various interior installations.
In this case, we’re talking about interior acrylic latex caulk used for drywall, masonry, and woodwork, like trim. Also known as “painter’s caulk,” it helps provide a finished look to details like window trim, door trim and baseboard moulding.
To Caulk or Not To Caulk
That is the question! And the answer is yes. Caulking ensures your baseboards fit nicely and snugly against your floors and walls. If your moulding has a flush fit, caulking isn’t necessary. However, it is still advisable. The truth is, very few homes have perfectly even walls, new or old.
Caulking is best when you nail your boards to the wall and see a tiny gap between the wall and moulding. Also, when using a nail gun, you can quickly fill in the holes with a dab of caulking. As a result, you’ll get a smooth, finished surface ready for paint.
Now, if you use an adhesive to affix the moulding to the wall to avoid caulking, don’t. Remember to use glue for things like ceiling medallions, crown moulding or wall panels, but it’s best to add some nails for a safe, secure fit.
However, for baseboards, glue creates its own set of challenges. It’s a nightmare if you want to remove the boards to install new flooring or upgrade your baseboards to a more substantial design. So, it’s always best to nail than glue baseboards.
How to Choose the Right Caulking for Baseboard Moulding
We’re giving you fair warning that the caulking aisle in most big box home renovation stores is overwhelming. There are not only tons of different products in the aisle, but more than one aisle where you’ll find various caulking products in these massive stores.
So, you want to head to the paint department when choosing caulking for baseboard mouldings. Alternatively, and far more simply, click here to see our painter’s caulk! You’re looking for interior moulding and trim painters caulk made of acrylic latex with silicone. It provides the adhesion and flexibility needed for baseboard moulding while reducing the possibility of shrinkage.
Tip: Don’t forget the caulking gun. Most caulk comes in a tube that requires a caulking gun that forces the caulking out of the tube for application.
How to Install Caulking for Baseboard Moulding
Follow these steps when installing caulking for baseboard moulding:
1.Start with a clean slate
Caulking is quite “gooey” and sticky. So, you want to ensure the walls and floors are free of cobwebs, dust, crumbs, etc. A vacuum will help remove the mess. You want every last particle out of the way for a clean slate. Otherwise, the caulking will adhere to the dirt, not the wall and moulding, creating a real mess and not providing a proper seal.
2.Place the caulking tube into the caulking gun.
Slide your caulking tube into the gun and carefully use a sharp knife to remove the end of the applicator tip. Always cut away from yourself and use a 45-degree angle to optimize the caulking distribution. Ensure the tip is smooth and free of any plastic, or you won’t get a smooth finish as the caulking comes out.
3.Push the presser to release the caulking
Position your cut to sit against the wall properly, with the angle facing up. Push the presser rod or “trigger” until you see the caulk come to the tip of the applicator. Position the applicator tip to the top of the moulding where it meets the wall.
4.Apply the caulking
You want to push the trigger while pulling the gun along the line of the moulding, dragging the tube to fill the joints. Ensure you exert the same pressure and speed as you move to get the best results. Otherwise, you’ll create blobs and miss some spaces as you work.
Also, too much pressure will block the tip, preventing the caulking from escaping. So, relax a bit as you drag the gun!
5.Smooth and remove excess caulking
Stand back and look for any areas with large blobs or missed spaces. Using a damp, clean rag or paper towel, drag the cloth along the bead of caulk to create a smooth finish and fill any missed areas. Do this step before the caulk begins to set.
6.Let the caulking cure
Since the caulking material is flexible, it’s essential to let the caulking cure for at least three hours before you walk into the area. It will prevent it from moving away from the wall and whipping up any dirt that might settle into the wet caulking.
Although it should be mostly dry in about three hours, it takes at least a day to cure. Give it one day to see the best results.
7.Fill nail holes
You can dab a little caulking to fill nail holes for PVC moulding. You can also use wood filler on MDF and wood baseboard moulding. However, it requires sanding. Smooth the caulking with a damp cloth and remove access. Let it dry completely before painting. Be sure you remove any smears outside the hole.
What Are the Benefits of Caulking Baseboard Moulding?
There are several benefits to caulking baseboard moulding:
- You create a perfect finish.
- You help stop air from escaping through the walls and floor. Your home won’t feel as drafty.
- You can minimize water damage to flooring if you experience a leak from above.
Although caulking adds one more step to your baseboard moulding installation, it’s worth the effort for that professional finish, a comfier home and added protection against water damage.
Visit our website and start shopping for our impressive baseboard moulding. For more information, call (855) 457-1039 or contact us here.